Drag Racing Specialties
Innovators not Imitators
Plano, Texas Madison, Mississippi
bherrick@slotcar.com
Drag Chassis
The chassis are shown completely assembled from the instruction sheets for clarity.
This is not the way that we sell them.
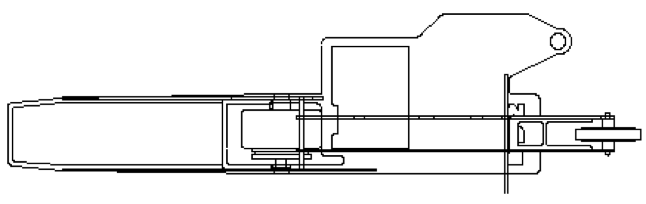
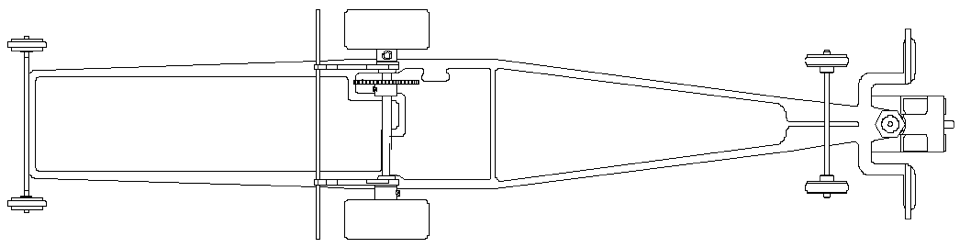
DRS-01 Pro-Strap Chassis Kit
The FIRST Spring Steel Slot Drag Car Chassis ever made!
Set the Pro-Stock Record in its First Race and is STILL SETTING THE STANDARD.
This chassis has been designed for the Blown Doorslammer or Pro-Stock class and all classes that use a doorslammer type body with a cobalt strap motor at a minimum weight of 90 grams. Our chassis has floating pans to make the weight instead of lead weights added as ballast because this class of car needs to have a means of absorbing the shock of the launch. The motor box has been designed for Group 7 or 27 Strap Type Cobalt Motors and when used with the correct gears, the motor angle and gear meshes are optimum. The Choice of The Fast Crowd!
Classes Recommended for: Blown Doorslammer, Pro Stock, Quick 16, and Brackets
CHOOSING THE PROPER CHASSIS CONFIGURATION: SDRA Pro Stock cars must weight 90 grams, and to make weight you will usually need to include the pans that come with the chassis. They may be left in place attached to the chassis or cut loose and hinged, if desired. Body mounts can also be made static or hinged. If floating body mounts are desired, a floating body mount kit intended for road race cars can be used. To hinge the pans, use .032 wire and 1/16" brass square tubing, as shown.
REMOVING PARTS FROM MAIN CHASSIS: First, put on safety goggles or glasses, then use your moto-tool fitted with the cut-off wheel to remove the rear uprights, and front axle holder from the main chassis. Cut tabs, then trim sharp stubs from both parts & chassis. If the pans are to be hinged, cut tabs to remove them, then trim sharp stubs.
BEGINNING ASSEMBLY: Trim flash from slots for uprights and front axle holder until parts fit easily, then, using 280 or 320 grit Wet-or-dry, sand top side of chassis and both sides of uprights and axle holder. If pans are to be hinged, their topside and front slot should be sanded also. Gray coating on steel should be removed down to bare metal. This will make soldering much easier, and save flux.
SOLDERING PARTS IN PLACE: Place chassis on heat-proof soldering block, then set one upright in place, flux joint and put hot soldering iron with small amount of solder melted on tip into seam between parts, then move back and forth slowly until solder smoothly fills seam. Repeat on other side of upright, then on opposite upright. Wash chassis with hot, soapy water, then dry, after each soldering operation. Don't forget to clean flux off soldering block each time you wash chassis. This will help prevent rusting, and preserve the chassis appearance. Solder front axle holder in place, using the same procedure. Add solder till joint is smoothly filleted.
BODY MOUNTS: Floating front mounts need a piece of larger tubing soldered to the chassis first, then the pin tubing inserted through from the outside, with retainer already soldered in place. Then the inner retainer is soldered to the pin tubing. The front mount can go on the front of the pan, or the front pad of the chassis itself, or the front axle can also be used the choice is yours. Rear mounts usually have a one-piece crossbar with retainers only on the outside. Again, solder larger tubing pair to chassis first, making sure they are lined up with each other. Solder a retainer to the pin tubing near one end, then insert the pin tubing through the floater tubing and solder second retainer to pin tubing, leaving a little side play. Be very careful with the flux and use very little solder, or the "floating" assembly can be soldered solid quite easily. Trim off pin tubing flush with the outside of the retainers, and you're through.
PAN MOUNTING: The pan hinges are made of .032 piano wire bent into an "L" shape and inserted into lengths of 1/16" brass square tubing. After the parts are bent, use the moto-tool to deburr the ends of the wire, then insert into the brass tube. Solder the brass tube to the front chassis pad, then solder the .032 wire into the slot in the pan. The rear of the pan hangs from the rear crossbar of the body mount, and is attached by small "L" shaped hangers, or a "U" that fits across between the pans.
FRONT AXLE AND WHEELIE BARS: Each has an axle with retainers outside and inside of both wheels. The front axle should be made from 1 piece of DRS-146 Stainless Pin Tubing First solder front axle in place on the axle stand and then using DRS-142 Retainers soldered or super-glued on each side of the DRS-148 Drilled Front Wheels. Thread the wheel, an inner retainer, another inner retainer, then the other wheel onto the axle and move them to the end already soldered. Now solder the other outer retainer to the axle and wash and dry all parts. Now solder inner retainers in place and leave enough clearance so that the wheels rotate freely. Wash and dry again, then oil wheels.. DRS-138 Wheelie axle assembly should be soldered on only after rear tires and guide flag with braid are installed.
Classes Recommended For: Blown Doorslammer, Pro Stock, Quick 16, Comp Eliminator, And Brackets, Recommended Bodies: DRS-503 Camaro, DRS-513 Firebird (For P/S) DRS-515 Stealth, DRS-516 Stingray (Can Be Used In Other Classes), Parts Recommended To Complete Rolling Chassis: DRS-134 Guide Flag And Nut, DRS-132 Drag Braid, DRS-148 .820 Drilled Front Wheels Or DRS-124 Undrilled Front Wheels, DRS-146 .050 Stainless Steel (2 Required), DRS-142 .047 Retainers Or DRS-143 .063 Retainers, DRS-138 Wheelie Bar Axle With Wheels, TQ Drag Wire, K&S 1/8 X 1/8 Square Box TubingCHOOSING THE PROPER CHASSIS CONFIGURATION: SDRA Pro Stock cars must weight 90 grams, and to make weight you will usually need to include the pans that come with the chassis. They may be left in place attached to the chassis or cut loose and hinged, if desired. Body mounts can also be made static or hinged. If floating body mounts are desired, a floating body mount kit intended for road race cars can be used. To hinge the pans, use .032 wire and 1/16" brass square tubing, as shown.
REMOVING PARTS FROM MAIN CHASSIS: First, put on safety goggles or glasses, then use your moto-tool fitted with the cut-off wheel to remove the rear uprights, and front axle holder from the main chassis. Cut tabs, then trim sharp stubs from both parts & chassis. If the pans are to be hinged, cut tabs to remove them, then trim sharp stubs.
BEGINNING ASSEMBLY: Trim flash from slots for uprights and front axle holder until parts fit easily, then, using 280 or 320 grit Wet-or-dry, sand top side of chassis and both sides of uprights and axle holder. If pans are to be hinged, their topside and front slot should be sanded also. Gray coating on steel should be removed down to bare metal. This will make soldering much easier, and save flux.
SOLDERING PARTS IN PLACE: Place chassis on heat-proof soldering block, then set one upright in place, flux joint and put hot soldering iron with small amount of solder melted on tip into seam between parts, then move back and forth slowly until solder smoothly fills seam. Repeat on other side of upright, then on opposite upright. Wash chassis with hot, soapy water, then dry, after each soldering operation. Don't forget to clean flux off soldering block each time you wash chassis. This will help prevent rusting, and preserve the chassis appearance. Solder front axle holder in place, using the same procedure. Add solder till joint is smoothly filleted.
BODY MOUNTS: Floating front mounts need a piece of larger tubing soldered to the chassis first, then the pin tubing inserted through from the outside, with retainer already soldered in place. Then the inner retainer is soldered to the pin tubing. The front mount can go on the front of the pan, or the front pad of the chassis itself, or the front axle can also be used the choice is yours. Rear mounts usually have a one-piece crossbar with retainers only on the outside. Again, solder larger tubing pair to chassis first, making sure they are lined up with each other. Solder a retainer to the pin tubing near one end, then insert the pin tubing through the floater tubing and solder second retainer to pin tubing, leaving a little side play. Be very careful with the flux and use very little solder, or the "floating" assembly can be soldered solid quite easily. Trim off pin tubing flush with the outside of the retainers, and you're through.
PAN MOUNTING: The pan hinges are made of .032 piano wire bent into an "L" shape and inserted into lengths of 1/16" brass square tubing. After the parts are bent, use the moto-tool to deburr the ends of the wire, then insert into the brass tube. Solder the brass tube to the front chassis pad, then solder the .032 wire into the slot in the pan. The rear of the pan hangs from the rear crossbar of the body mount, and is attached by small "L" shaped hangers, or a "U" that fits across between the pans.
FRONT AXLE AND WHEELIE BARS: Each has an axle with retainers outside and inside of both wheels. The front axle should be made from 1 piece of DRS-146 Stainless Pin Tubing First solder front axle in place on the axle stand and then using DRS-142 Retainers soldered or super-glued on each side of the DRS-148 Drilled Front Wheels. Thread the wheel, an inner retainer, another inner retainer, then the other wheel onto the axle and move them to the end already soldered. Now solder the other outer retainer to the axle and wash and dry all parts. Now solder inner retainers in place and leave enough clearance so that the wheels rotate freely. Wash and dry again, then oil wheels.. DRS-138 Wheelie axle assembly should be soldered on only after rear tires and guide flag with braid are installed.
Classes Recommended For: Blown Doorslammer, Pro Stock, Quick 16, Comp Eliminator, And Brackets, Recommended Bodies: DRS-503 Camaro, DRS-513 Firebird (For P/S) DRS-515 Stealth, DRS-516 Stingray (Can Be Used In Other Classes), Parts Recommended To Complete Rolling Chassis: DRS-134 Guide Flag And Nut, DRS-132 Drag Braid, DRS-148 .820 Drilled Front Wheels Or DRS-124 Undrilled Front Wheels, DRS-146 .050 Stainless Steel (2 Required), DRS-142 .047 Retainers Or DRS-143 .063 Retainers, DRS-138 Wheelie Bar Axle With Wheels, TQ Drag Wire, K&S 1/8 X 1/8 Square Box Tubing
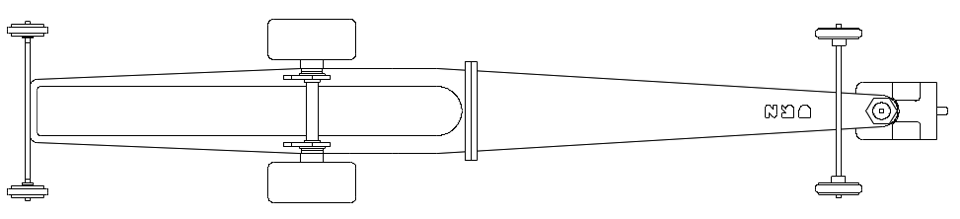
DRS-03, Pro Cee Chassis Kit
The Second Spring Steel Slot Drag Car Chassis ever made!
This chassis has been designed for the Factory-Modified, Hard Body Classes, Pro-Modified, Top Gun and Top-Sportsman classes. These classes are based on c-can type group 12 and 20 motors. The motor box has been designed for c-can type motors and when used with the correct gears, the motor angle and gear mesh are optimum. We also have a DRS-111 motor tab available separately which allows the motor to be mounted with screws, not solder. A longer wheelbase equals a smoother, more consistent car. Especially on less than optimum tracks!
Classes Recommended for: Factory Modified, Factory Experimental, Super Stock, Top-Gun, Top Sportsman, Super Comp, Super Gas, Super Street, Quick 16, and Brackets.
REMOVING PARTS FROM MAIN CHASSIS: First, put on safety goggles or glasses, then use your moto-tool fitted with the cut-off wheel to remove the rear uprights, and front axle holder from the main chassis. Cut tabs, then trim sharp stubs from both parts & chassis. If the pans are to be hinged, cut tabs to remove them, then trim sharp stubs.
BEGINNING ASSEMBLY: Trim flash from slots for uprights and front axle holder until parts fit easily, then, using 280 or 320 grit Wet-or-dry, sand top side of chassis and both sides of uprights and axle holder. If pans are to be hinged, their topside and front slot should be sanded also. Gray coating on steel should be removed down to bare metal. This will make soldering much easier, and save flux.
SOLDERING PARTS IN PLACE: Place chassis on heat-proof soldering block, then set one upright in place, flux joint and put hot soldering iron with small amount of solder melted on tip into seam between parts, then move back and forth slowly until solder smoothly fills seam. Repeat on other side of upright, then on opposite upright. Wash chassis with hot, soapy water, then dry, after each soldering operation. Don't forget to clean flux off soldering block each time you wash chassis. This will help prevent rusting, and preserve the chassis appearance. Solder front axle holder in place, using the same procedure. Add solder till joint is smoothly filleted.
BODY MOUNTS: Floating front mounts need a piece of larger tubing soldered to the chassis first, then the pin tubing inserted through from the outside, with retainer already soldered in place. Then the inner retainer is soldered to the pin tubing. The front mount can go on the front of the pan, or the front pad of the chassis itself, or the front axle can also be used the choice is yours. Rear mounts usually have a one-piece crossbar with retainers only on the outside. Again, solder larger tubing pair to chassis first, making sure they are lined up with each other. Solder a retainer to the pin tubing near one end, then insert the pin tubing through the floater tubing and solder second retainer to pin tubing, leaving a little side play. Be very careful with the flux and use very little solder, or the "floating" assembly can be soldered solid quite easily. Trim off pin tubing flush with the outside of the retainers, and you're through.
FRONT AXLE AND WHEELIE BARS: Each has an axle with retainers outside and inside of both wheels. The front axle should be made from 1 piece of DRS-146 Stainless Pin Tubing First solder front axle in place on the axle stand and then using DRS-142 Retainers soldered or super-glued on each side of the DRS-148 Drilled Front Wheels. Thread the wheel, an inner retainer, another inner retainer, then the other wheel onto the axle and move them to the end already soldered. Now solder the other outer retainer to the axle and wash and dry all parts. Now solder inner retainers in place and leave enough clearance so that the wheels rotate freely. Wash and dry again, then oil wheels.. DRS-138 Wheelie axle assembly should be soldered on only after rear tires and guide flag with braid are installed.
Classes Recommended For: Factory Modified, Factory Experimental, Super Stock, Top-Gun, Top Sportsman, Super Comp, Super Gas, Super Street, Quick 16, And Brackets. Recommended Bodies: DRS-503 Camaro, DRS-513 Firebird (For F/M) DRS-515 Stealth, DRS-516 Stingray
Parts Recommended To Complete Rolling Chassis: DRS-134 Guide Flag And Nut, DRS-132 Drag Braid, DRS-148 .820 Drilled Front Wheels Or DRS-124 Undrilled Front Wheels, DRS-146 .050 Stainless Steel (2 Required), DRS-142 .047 Retainers Or DRS-143 .063 Retainers, DRS-138 Wheelie Bar Axle With Wheels, TQ Drag Wire, K&S 1/8 X 1/8 Square Box Tubing.
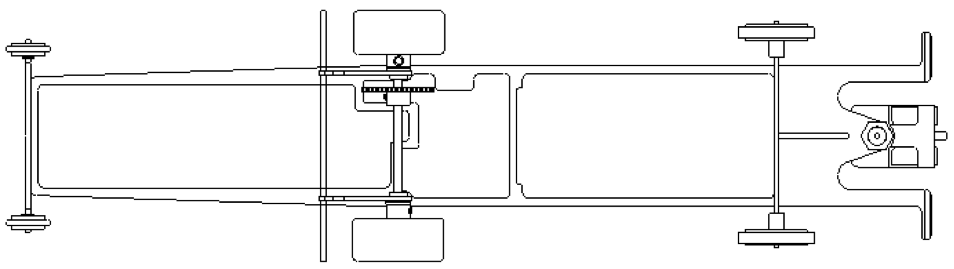
DRS-09 Pro Cee Funny Car Chassis Kit
The Fifth Spring Steel Slot Drag Car Chassis ever made!
Set the A/FC Record in its First Race and is STILL SETTING THE STANDARD.
This chassis has been designed for the A/FC or BB/FC funny car class. The A/FC class uses a group 20 motor with a minimum weight limit of 90 grams. The BB/FC class uses a group 12 motor with a minimum weight limit of 90 grams.
Classes Recommended for: A/FC, BB/FC, E/FC, Super Comp, Quick 16, And Brackets.
REMOVING PARTS FROM MAIN CHASSIS: First, put on safety goggles or glasses, then use your moto-tool fitted with the cut-off wheel to remove the rear uprights, and front axle holder from the main chassis. Cut tabs, then trim sharp stubs from both parts & chassis. If the pans are to be hinged, cut tabs to remove them, then trim sharp stubs.
BEGINNING ASSEMBLY: Trim flash from slots for uprights and front axle holder until parts fit easily, then, using 280 or 320 grit Wet-or-dry, sand top side of chassis and both sides of uprights and axle holder. If pans are to be hinged, their topside and front slot should be sanded also. Gray coating on steel should be removed down to bare metal. This will make soldering much easier, and save flux.
SOLDERING PARTS IN PLACE: Place chassis on heat-proof soldering block, then set one upright in place, flux joint and put hot soldering iron with small amount of solder melted on tip into seam between parts, then move back and forth slowly until solder smoothly fills seam. Repeat on other side of upright, then on opposite upright. Wash chassis with hot, soapy water, then dry, after each soldering operation. Don't forget to clean flux off soldering block each time you wash chassis. This will help prevent rusting, and preserve the chassis appearance. Solder front axle holder in place, using the same procedure. Add solder till joint is smoothly filleted.
BODY MOUNTS: Floating front mounts need a piece of larger tubing soldered to the chassis first, then the pin tubing inserted through from the outside, with retainer already soldered in place. Then the inner retainer is soldered to the pin tubing. The front mount can go on the front of the pan, or the front pad of the chassis itself, or the front axle can also be used the choice is yours. Rear mounts usually have a one-piece crossbar with retainers only on the outside. Again, solder larger tubing pair to chassis first, making sure they are lined up with each other. Solder a retainer to the pin tubing near one end, then insert the pin tubing through the floater tubing and solder second retainer to pin tubing, leaving a little side play. Be very careful with the flux and use very little solder, or the "floating" assembly can be soldered solid quite easily. Trim off pin tubing flush with the outside of the retainers, and you're through.
FRONT AXLE AND WHEELIE BARS: Each has an axle with retainers outside and inside of both wheels. The front axle should be made from 1 piece of DRS-146 Stainless Pin Tubing First solder front axle in place on the axle stand and then using DRS-149 Retainers soldered or super-glued on each side of the DRS-148 Drilled Front Wheels. Thread the wheel, an inner retainer, another inner retainer, then the other wheel onto the axle and move them to the end already soldered. Now solder the other outer retainer to the axle and wash and dry all parts. Now solder inner retainers in place and leave enough clearance so that the wheels rotate freely. Wash and dry again, then oil wheels.. DRS-138 Wheelie axle assembly should be soldered on only after rear tires and guide flag with braid are installed.
Classes Recommended For: A/FC, E/FC, Quick 16, And Brackets. Recommended Bodies: Or DRS-511 Vette F/C, DRS-536 Camaro F/C, DRS-537 HDF Camaro F/C.
Parts Recommended To Complete Rolling Chassis: DRS-134 Guide Flag And Nut DRS-132 Drag Braid, DRS-149 Drilled Or DRS-125 Undrilled .500 Front Wheels, DRS-146 .050 Stainless Steel (2 Required), DRS-142 .047 Retainers Or DRS-143 .063 Retainers, DRS-138 Wheelie Bar Axle With Wheels, TQ Drag Wire, K&S 1/8 X 1/8 Square Box Tubing.

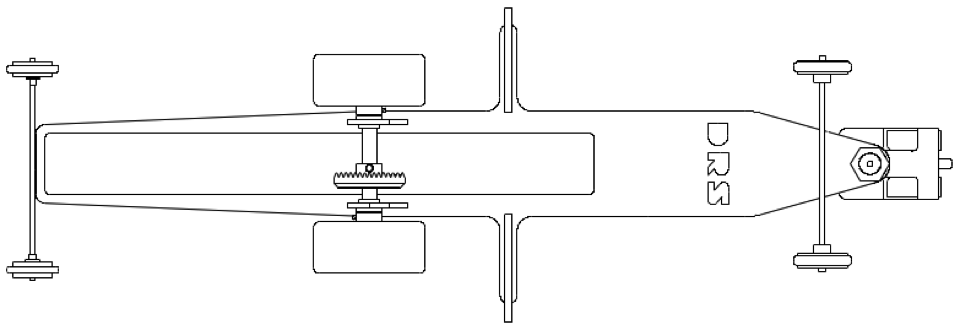
DRS-19 Pro Dragster Chassis Kit
This chassis has been designed for the AA/FD class w/Grp. 7 motor, TA/D class w/Grp. 27 motor, A/D class w/Grp. 20 motor. This chassis has been designed to accept strap motors, or, c-can type motors. We were to do this, as a dragster body is not as narrow as a funny-car body. All that needs to be done to accomplish this is to trim the rear motor attachment brace slightly to allow for the larger diameter c-can motor. Classes Recommended for: All Dragster Classes, Quick 16, and Brackets. Recommended Bodies: DRS-522 DRS/Wedge. We recommend race tested and approved Genuine DRS parts to complete your Rolling Chassis. DRS-134 Guide Flag And Nut, DRS-132 Drag Braid, DRS-149 Drilled or DRS-125 Undrilled .500 Front Wheels, DRS-146 .050 Stainless Steel (3 required), DRS-142 .047 Retainers, DRS-103 3/32 Bearings, DRS-153 3/32 Solid Axle or DRS-155 Hollow Axle, DRS-110 Drag Tires, DRS-138 Wheelie Bar Axle With Wheels, K&S .047 Wire

DRS-25 KIT Pro-Dragbike Chassis
This chassis has been designed for the Dragbike enthusiast to use in all Dragbike classes. These are some of the most fun classes in slot drag racing. Where you can compete in the top classes without the large expense usually associated with high-end racing. This chassis is designed with a belt drive system and comes complete with a specific front and rear wheel, the drive pulley for the motor, and also the drive belt. Our rear wheel has the drive pulley built into the rear hub and comes with the rubber already mounted to the rim. The kit and assembled chassis will come with all the parts necessary to build your Dragbike that are not readily available in the slot car industry. We do recommend that you do use bearing's for the 1/8" rear axle and motor (at least on the drive side) to prevent wear and subsequent axle wobble that could hurt performance. Our unique design does not really need a body, just a flat piece of lexan, or thin aluminum to make the top of the gas tank, seat, and rear fender. Try the Drag Racing Specialties “blueprinted” c-can motors for the best performance! Classes Recommended for: Dragbike. Recommended Bodies: DRS-504 Drag Bike Shell. We recommend race tested and approved Genuine DRS parts to complete your Rolling Chassis., DRS-115* Rear Wheel, DRS-116* Drive Belt, DRS-117* Motor Pulley, DRS-118* Front Wheel, DRS-134 Guide Flag And Nut, DRS-132 Drag Braid, DRS-146 .050 Stainless Steel, DRS-143 .063 Retainers, DRS-104 1/8 Bearings or DRS-152 1/8 Oilites, DRS-154 1/8 Solid Axle, DRS-138 Wheelie Bar Axle With Wheels, TQ Drag Wire, K&S .063 Wire, *Parts are included in kit. They are also available separately.


DRS-33 GEN II True-Scale Dragster
This chassis is the one all you dragster fans have been waiting for. We know that the wedge type dragster body does not have a scale appearance. The wedge body has but one purpose and that is to go fast and it does that very well. This chassis is patterned after Swamp Rat 30. We chose this car because it is with out a doubt the most famous dragster ever built. After all how many Dragsters are on display at the Smithsonian institute in Washington D.C. This chassis is completely cut from spring steel; this includes parts like the steering linkage, bulkheads, roll cage, and the wing struts. This chassis uses 1/8" rear axle and a screw mounted c-can motor approximate weight is 105 grams.
READ INSTRUCTIONS THOROUGHLY BEFORE STARTING ASSEMBLY!
TOOLS YOU WILL NEED FOR THIS JOB INCLUDE:
1. Safety goggles or glasses with shatterproof lenses.
2. Dremel Moto-tool, with abrasive cut-off wheel; carbide burr for deburring edges and slots.
3. Wet-or-dry sandpaper, assorted grits (280 to 600).
4. Soldering iron with iron-plated tip made especially for soldering steel.
5. Heat proof soldering block.
6. Soldering flux, preferably Stay-Kleen, available at many good hardware, auto supply stores or Plumbing Supply.
7. We also recommend the use of 98% tin, 2% silver solder (Stay-Brite) or equivalent.
ASSEMBLY ORDER: please read and understand all instructions before beginning assembly
1 Put on safety glasses, then separate parts from each other with cut-off tool, and deburr. Grind edges and tabs to assure good part fit and clean solder joints.
2 Insert the motor mount tab in chassis bottom as illustrated on the right. After assuring proper fit, tack solder motor tab in position, keeping motor tab square with chassis bottom at a 90 degree angle from chassis bottom.
3 Add chassis sides to chassis bottom one at a time install front axle in front axle slots as illustrated in fig.3 on the back of this sheet.
4 After assuring a good fit, begin tack soldering the side in one side at a time, beginning with the front tab and working one tab at a time until the motor tab is reached.
5 After finishing one side repeat processes with second side and inserting the main hoop and forward hoop of the roll cage as illustrated in Fig. 2 assuring the sides are square with the bottom of the chassis.
6 After finishing the sides, and assuring that they are square 90 degrees from the bottom of the chassis, center the front axle in place and solder it in place on both sides.
7 Install and solder chassis pin tubing in the wing struts as shown in figure 2 be sure to get a good solder joint as this will help to stabilize the chassis for final soldering.
8 Add the last two roll cage members to the chassis then add the body mounts forward of the motor tab, and under the roll cage as shown in fig 2. Cut body mount tubing to fit body and deburr tubing to allow smooth insertion of pins.
9 Make one last check that everything is square and true then make all final solder joints staring by filling in the outsides of all tabs, and along the bottom of the chassis where the chassis side meets the bottom, you should have one long smooth joint along each side of the chassis bottom.
10 Make another check that everything has stayed true after you solder each joint.
11 Add front pin tubing as shown in fig 3 for front body wing.
12 Add tubing to front axle for front wheels on the top edge of the front axle as shown in fig 3.
13 At this point it would be a very good idea to wash the chassis well with hot soapy water, and dry well.
14 Add Wheelie bar axle (DRS-138) to chassis , and check all solder joints over the complete chassis, fix any questionable solder joints.
15 Wash chassis and work area again with hot soapy water, use an old toothbrush to get everywhere on the chassis and dry the chassis thoroughly..
16 The best advice we can give to maintain the chassis is to wash it well with HOT water and soap, and dry thoroughly, we like to use “Neverdull” Brand cotton wadding to polish the chassis..
17 Once the chassis is finished we recommend Genuine DRS accessories to complete your newRace Car.
Recommended DRS parts to complete your True Scale Dragster
DRS-134 Drag Guide (1 required)
DRS-132 Drag Braid (1 pr. required)
DRS-138 Precision Wheelie Bar axle w/ wheels (1 required)
DRS-142 .047 Brass retainers (4. required)
DRS-148 .820 Drilled Front Wheels (1 pr. required)
DRS-189 .050 Stainless Body tubing (2 Sticks required)
DRS 538 “True Scale” Dragster Body (1 required)
DRS-43 "JR." DRAGSTER CHASSIS Kit
This chassis has been designed to use the new DRS-512 "Jr." Dragster body. It features an inline motor mount, 1/8” axle, and most important a price that is lower than most of the wire chassis on the market and not much more than the stamped steel chassis. The “Jr. Dragster” is built from spring steel, and these chassis feature most of the things that are on our pro chassis like pillowblocks, body mounting provisions, and integral wheelie bars.
Classes Recommended for: Jr. Dragster, and Brackets. Recommended Bodies: DRS-512 Jr. Dragster Body We recommend race tested and approved Genuine DRS parts to complete your Rolling Chassis. DRS-134 Guide Flag And Nut, DRS-132 Drag Braid, DRS-149 Drilled or DRS-125 Undrilled .500 Front Wheels, DRS-142 .047 Retainers or DRS-143 .063 Retainers**, DRS-138 Wheelie Bar Axle With Wheels, DRS-157 Inline Motor Tab for Screw Mounted motors, K&S .047 Wire, K&S 1/16 Round Brass Tubing.

The DRS-45 Bracketmaster Chassis Kit
The first Low Priced Drag Chassis on the Market
It features an inline motor mount, 1/8” axle, and most important a price that is lower than most of the wire chassis on the market and not much more than the stamped steel chassis. The “Bracket Master” is built from spring steel, and these chassis feature most of the things that are on our pro chassis like pillowblocks, body mounting provisions, and integral wheelie bars.
Classes Recommended For: Factory Modified, Factory Experimental, Super Stock, Top-Gun, Top Sportsman, Super Comp, Super Gas, Super Street, Pro Mod, Quick 16, And Brackets. Recommended Bodies: DRS-506 53 Studebaker, DRS-513 Firebird, DRS-516 Stingray, DRS-533 Camaro, DRS-539 Cavalier, DRS-543 Cougar, DRS-547 Stealth. Parts Recommended To Complete Rolling Chassis: DRS-134 Guide Flag And Nut, DRS-132 Drag Braid, DRS-148 .820 Drilled Front Wheels Or DRS-124 Undrilled Front Wheels, DRS-142 .047 Retainers Or DRS-143 .063 Retainers, DRS-146 .050 Stainless Steel, DRS-138 Wheelie Bar Axle With Wheels, TQ Drag Wire and Sonic Gears.

DRS-49 KIT Ultralite Funny Car Chassis Kit
This Chassis Is One Of The Lightest, And The Easiest To Assemble Spring Steel Funny Car Chassis On The Market. Most Important Of All This Chassis Was Designed By The Company That Produces Chassis For Drag Racing!! Our Chassis Features Very Few Solder Joints And All Unnecessary Parts Have Been Eliminated To Give You A Lightweight Winning Chassis That Does Not Run The Risk Of Having One Of The Many Solder Joints Come Loose At The Worst Possible Time, In The Final Round With sixty seconds To Stage!!
This Chassis Is Recommended For The Advanced Racer As Racing Lightweight Chassis At The Absolute Limit Is Not Something That Is Learned Overnight. We At Drag Racing Specialties Only Build Drag Chassis With The Gear Inside Of The Frame Rails Because This Is The Best Way To Evenly Distribute The Shock Of The Launch Equally Down Both Sides Of The Chassis. Just Try To Imagine A 1=1 Scale Drag Car With Either The Ladder Bars Or 4-Link Installed With One Side Offset From The Other, Rest Assured That Car Would Not Launch Straight And True With The Consistency That Is Required For You To Win The “Big Race”!!
This Information Has Been Obtained From Years Of Experience Drag Racing Slot Cars From California To Maine. Just Ask Your Self This Question: Which Products Win Races And Set Records?
Recommended Body: DRS-511 1994 Vette, DRS-536 Camaro, DRS-537 High Down Force Camaro
Recommended Gears: Sonic Products Spur Gear (50t) #31-46. Use A 12 Tooth Pinion #30-12 With A Group 7 Armature And A 15 Tooth Pinion #30-15 With A Group 27 Armature.
Recommended Wheels: Fronts: DRS-149 .500 Diameter Drilled Front Wheels.

DRS-61 VW Chassis Kit
Fits Most VW Bodies
This chassis has been designed for the factory-modified, pro-modified, top-gun top-sportsman and VW classes. These classes are based on c-can type 16d or group 12 and 20 motors. The motor box has been designed for narrow c-can type motors and when used with the correct gears, the motor angle and gear mesh are optimum. We also have a DRS-111 motor tab available separately which allows the motor to be mounted with screws, not solder. Classes Recommended for: Volkswagen Or Others. Recommended Bodies: DRS-517 Volkswagen. We recommend race tested and approved Genuine DRS parts to complete your Rolling Chassis. DRS-134 Guide Flag And Nut, DRS-132 Drag Braid, DRS-148 .820 Drilled Front Wheels or DRS-124 Undrilled Front Wheels, DRS-146 .050 Stainless Steel (2 required), DRS-142 .047 Retainers or DRS-143 .063 Retainers DRS-138 Wheelie Bar Axle With Wheels, TQ Drag Wire, K&S 1/8 X 1/8 Square Box Tubing
DRS-67 JR. Funny Car Chassis
This chassis can be built with two different wheelbase lengths. The rear pillowblocks have the locating tab offset. By turning them around to the short version you can use our DRS-521 Trans-Am Jr. funny car body! Use 1/16” brass tubing on the front axle to mount DRS-125 front wheels and the front of the body. Use 1/16” brass tubing on the rear body mounting tabs to mount the rear of the body. Classes Recommended for: Jr. Funny Car, Brackets.
We recommend race tested and approved Genuine DRS parts to complete your Rolling Chassis. DRS-134 Guide Flag And Nut, DRS-132 Drag Braid, DRS-149 Drilled Or DRS-125 Undrilled .500 Front Wheels, DRS-138 Wheelie Bar Axle With Wheels, DRS-157 Inline Motor Tab for Screw Mounted motors, K&S .047 Wire, K&S 1/16 Round Brass Tubing

DRS 71 Bracketmaster Funny Car Chassis
This Chassis Can Be Built With Two Different Wheelbase Lengths. The Rear Pillowblocks Have The Locating Tab Offset. By Turning Them Around To The Short Version You Can Either Use Our DRS-511 Vette Or The 536 Camaro. Or You Can Also Use Our 537 Camaro High Down Force Body. In The Long Version. We recommend race tested and approved Genuine DRS parts to complete your Rolling Chassis. DRS-134 Guide Flag And Nut, DRS-132 Drag Braid, DRS-149 .820 Drilled Front Wheels or DRS-125 Undrilled Front Wheels, DRS-146 .050 Stainless Steel, DRS-138 Wheelie Bar Axle With Wheels
DRS-75 Bracket Master II Chassis Kit
Can an improvement be made to the most popular drag chassis ever made? The original bracket master? You bet! The new Bracket Master II features a sidewinder motor mount and is set up for a 3/32" axle. This is Bob’s chassis of choice for the super classes as well as brackets. He has Trucks, Firebird’s, Corvette’s and with either 12 or 20 motors they build out at about 85 grams so running them in class racing you just have to add a little weight to be legal. Absolutely the best value on the market. At Drag Racing Specialties The Sportsman Racers Are Our Most Valued Customers And This Chassis Is For You. Classes Recommended for: Factory Modified, Factory Experimental, Super Stock, Top-Gun, Top Sportsman, Super Comp, Super Gas, Super Street, Quick 16, and Brackets Recommended Bodies: DRS-513 Firebird, DRS-516 Stingray, We recommend race tested and approved Genuine DRS parts to complete your Rolling Chassis. DRS-134 Guide Flag And Nut, DRS-132 Drag Braid, DRS-148 .820 Drilled Front Wheels or DRS-124 Undrilled Front Wheels, DRS-146 .050 Stainless Steel, DRS-138 Wheelie Bar Axle With Wheels, K&S 1/16 Round Brass Tubing, TQ Drag Wire

DRS-77 Bracket Master II Funny Car Chassis
This chassis was designed for the racer who knows that the spring steel chassis is the way to go but is on a budget. This chassis features a lot of the things that are on our pro chassis like pillowblocks, body mounting provisions, and integral wheelie bars. They are also designed to take c-can motors. Classes Recommended for: Funny Car, Super Comp, Quick 16, and Brackets. Recommended Bodies: DRS-511 Vette F/C, DRS-536 Camaro, DRS-537 High Down Force Camaro. We recommend race tested and approved Genuine DRS parts to complete your Rolling Chassis. DRS-134 Guide Flag And Nut, DRS-132 Drag Braid, DRS-149 Drilled Or DRS-125 Undrilled .500 Front Wheels, DRS-146 .050 Stainless Steel (2 required), DRS-142 .047 Retainers or DRS-143 .063 Retainers, DRS-138 Wheelie Bar Axle With Wheels

DRS-79 Bracket Master II Dragster Chassis Kit
This chassis was designed for the racer who knows that the spring steel chassis is the way to go but, is on a budget. This chassis features a lot of the things that are on our pro chassis like pillowblocks, body mounting provisions, and integral wheelie bars. They are also designed to take c-can motors.

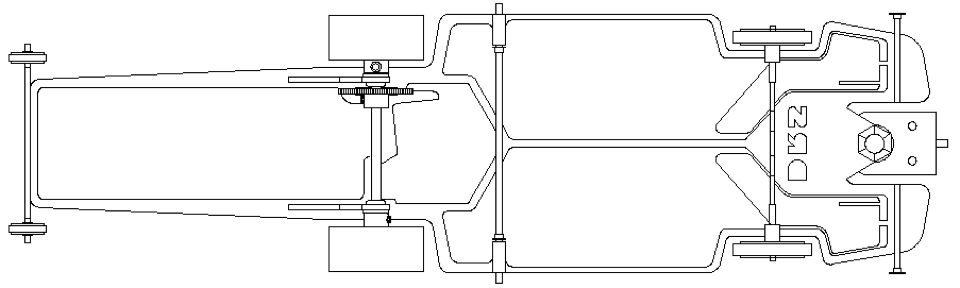
DRS-95 Hardbody Doorslammer Chassis
If you will notice on the chassis drawing, the motor box has a new look. The rear pillowblocks are reversible to vary the wheelbase at the rear of the car. With this in mind, along with the fact that no one uses the same gear ratio, we came up with a new design for c-can motor boxes, one that will allow you to choose for yourself. We recommend race tested and approved Genuine DRS parts to complete your Rolling Chassis. DRS-134 Guide Flag And Nut, DRS-132 Drag Braid, DRS-148 .820 Drilled Front Wheels or DRS-124 Undrilled Front Wheels, DRS-146 .050 Stainless Steel Pin Tube (2 required), DRS-138 Wheelie Bar Axle With Wheels, K&S 1/16 Round Brass Tubing

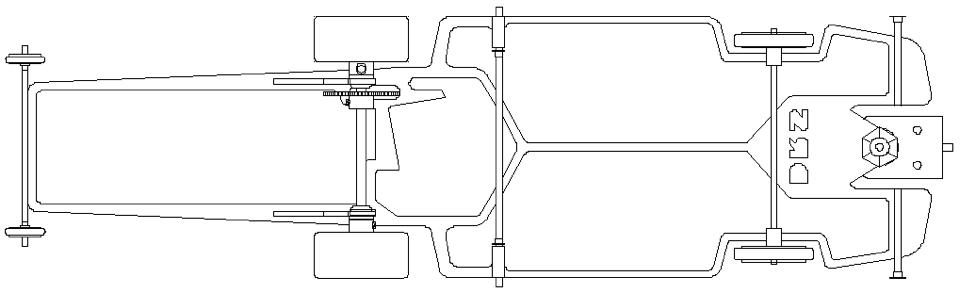
DRS-97 Pro Truck Chassis
DRS-SW01 Chassis
We know this class will be popular and bring to you a new chassis designed for this type of racing. We recommend race tested and approved Genuine DRS parts to complete your Rolling Chassis. DRS-134 Guide Flag And Nut, DRS-549 Sonoma Truck Body, DRS-132 Drag Braid, DRS-148 .820 Drilled Front Wheels or DRS-124 Undrilled Front Wheels, DRS-146 .050 Stainless Steel Pin Tube (2 required), DRS-138 Wheelie Bar Axle With Wheels, K&S 1/16 Round Brass Tubing
More New Ideas from the Leader in Slot Car Drag Racing Technology!
Assembly Options and Instructions The new DRS-SW01 is a highly adaptable chassis, and can be built in a large number of variations. Before assembly, review the following body mount and configuration options:
Front Mount—Depending on body type and personal preference, the front of the body may be mounted at two points straight off the front to the sides of the nose, or to the axle tube where it meets the body wheel well.
Rear Mount – The rear of the body may be mounted with a solid or “floater” tube at the chassis balance point at the forward, higher upright hole or the slightly lower rear hole. Holes are large enough to permit proper “float” with either .050” or .062” tubing.
Wheelie Bar Braces – While not necessary for most C-Can motor applications, some motors (e.g., Top Gun or cobalt) or your personal preference may require wheelie bar braces can be fitted to the radius under the rear mount soldered to the upright over the two mounting holes or bent in a short “L” shape and soldered through the rear mounting hole.
DRS-SW03 Funny Car Chassis
New Ideas from the Leader in Slot Car Drag Racing Technology!
Assembly Options and Instructions The new DRS-SW03, is a highly adaptable chassis, and can be built in a large number of variations. Before assembly, review the following body mount and configuration options:
Front Mount – Depending on body type and personal preference, the front of the body may be mounted at two points straight off the front, to the sides of the nose, or to the axle tube where it meets the body wheel well.
Rear Mount – The rear of the body may be mounted with a solid or “floater” tube at the chassis balance point, at the forward, higher upright hole, or the slightly lower rear hole. Holes are large enough to permit proper “float” with either .050” or .062” tubing.
Wheelie Bar Braces – While not necessary for most C-Can motor applications, some motors (e.g., Top Gun or cobalt) or your personal preference may require wheelie bar braces. .038” to .062” wire can be fitted to the radius under the rear mount, soldered to the upright over the two mounting holes, or bent in a short “L” shape and soldered through the rear mounting hole.

DRS-SW07 Pro-Truck Chassis
New Ideas from the Leader in Slot Car Drag Racing Technology!
Assembly Options and Instructions The new DRS-SW07 is a highly adaptable chassis, and can be built in a large number of variations. Before assembly, review the following body mount and configuration options:
Front Mount – Depending on body type and personal preference, We recommend The New DRS-534 LWB Pro-Truck Body the front of the body may be mounted at two points straight off the front, to the sides of the nose, or to the axle tube where it meets the body wheel well.
Rear Mount – The rear of the body may be mounted with a solid or “floater” tube at the chassis balance point, at the forward, higher upright hole, or the slightly lower rear hole. Holes are large enough to permit proper “float” with either .050” or .062” tubing.
Wheelie Bar Braces – While not necessary for most C-Can motor applications, some motors (e.g., Top Gun or cobalt) or your personal preference may require wheelie bar braces. .038” to .062” wire can be fitted to the radius under the rear mount, soldered to the upright over the two mounting holes, or bent in a short “L” shape and soldered through the rear mounting hole.

DRS-SW09 Pro-Stock Chassis
This Chassis was designed for Strap Motors, Not C-Can Motors.
Assembly Options and Instructions The new DRS-SW09 is a highly adaptable chassis, and can be built in a large number of variations. Before assembly, review the following body mount and configuration options:
Front Mount – Depending on body type and personal preference, the front of the body may be mounted at two points straight off the front, to the sides of the nose, or to the axle tube where it meets the body wheel well.
Rear Mount – The rear of the body may be mounted with a solid or “floater” tube at the chassis balance point, at the forward, higher upright hole, or the slightly lower rear hole. Holes are large enough to permit proper “float” with either .

DRS-SW11 "Econo-Scale" Dragster Chassis
This chassis is one of the lightest, and the easiest to assemble spring steel dragster chassis on the market. Most important of all this chassis was designed by the company that produces chassis for drag racing!! Our chassis features very few solder joints and all unnecessary parts have been eliminated to give you a lightweight winning chassis that does not run the risk of having one of the many solder joints come loose at the worst possible time, in the final round with sixty seconds to stage!!
Parts Recommended To Complete Rolling Chassis Classes Recommended For: A/FD Class, Quick 16, And Brackets. Recommended Bodies: DRS-538 2002 True Scale Dragster Body, DRS-134 Guide Flag And Nut, DRS-132 Drag Braid, DRS-148 .820 Drilled Front Wheels, DRS-146 .050 Stainless Steel (5 Required), DRS-142 .047 Retainers, DRS-138 Wheelie Bar Axle With Wheels, TQ Drag Wire

DRS-SW13 Inline Chassis Kit 5 ¼ Guide Lead
Use with 1 1/16th to 1 1/8th Diameter Tires.
Fits: Revell Pontiac Trans Am Pro Stock, Olds Pro Stock, Revell '83 and Monogram '86 T-Bird Pro Stock kits.
We've heard your requests for a real Pro Type Inline Chassis for Hardbody racing, and the DRS SW13 is one of several chassis we've developed to respond to those needs The "California Style" of Hardbody racing makes use of both normal and large, wide, "scale" tires on older, "nostalgia"-style bodies.
As model kits of these cars are not as wide as later cars, and generally have a great deal of body tuck-under or curved sides, it makes tire clearance a major headache, even with existing sidewinder chassis and components. With the larger tires, an inline chassis is usually a necessity! Until now, the choice has been limited in the selection of parts used in the construction of inline chassis. The popular choice has been the brass style, "U-shaped" bracket that fits the rear axle, and has a provision for a screw in motor.
This is a stamped and folded piece that can have any number of problems, such as poor alignment of the rear axle (makes the car dog track as it goes down the drag strip) and most importantly, the alignment of the motor and axle! When the motor and axle are not aligned properly, it make a good gear mesh impossible. The axle and motor shaft MUST mounted at the same height.
The first advantage of the DRS SW13 solution is the front nose piece. It allows, depending on body type and personal preference, the front of the body to be mounted at three points: straight off the front, or to the sides of the nose with two different locations. Remove the pair of side frame horns that are not needed. It also has an adjustable front axle mount, which allows the use of a incredibly wide range of bodies, from muscle car favorites of the '60s and '70s all the way back to Gasser models of the '30s and '40s! And, of course, it will also work equally well with those lexan bodies that have been hard to use with a conventional sidewinder setup.
The DRS-SW13 chassis features a sturdy, precision .050" steel Motor Tab to mount your motor with screws, and rest assured, our motor tab and pillowblocks are exactly aligned properly for maximum performance. You will notice that the motor tab has provisions for either horizontal or vertical motor mounting. It also will take our new four screw motor mounting system that we developed for our new Gen III Motors, again either horizontal or vertical. The pillowblocks are sized for 3/32nd axles. No more adapters, and Ball Bearings are now easy to use! The rear of the body may be mounted with a solid or "floater" tube at the chassis balance point, at the forward, higher upright hole, or the slightly lower rear hole (as shown). Holes are large enough to permit proper "float" with either .050" or .062" tubing.

DRS-SW15 Inline Chassis Kit 4 ¾ Guide Lead
Use with 1 1/16th to 1 1/8th Diameter Tires.
Fits: Monogram '93&'99 Camaro, Monogram '93,'97,'01 Firebird, AMT '93&'98 Camaro, AMT '93&'98 Firebird Trans Am, Revell '99 Mustang Cobra, Revell '89,'90,&'91 Thunderbird SC (stock), Revell '89,'90,&'91 Pontiac Gran Prix, Revell '97 Vette (probably everybody's C5 Vettes).
We've heard your requests for a real Pro Type Inline Chassis for Hardbody racing, and the DRS SW15 is one of several chassis we've developed to respond to those needs The "California Style" of Hardbody racing makes use of both normal and large, wide, "scale" tires on older, "nostalgia"-style bodies.
As model kits of these cars are not as wide as later cars, and generally have a great deal of body tuck-under or curved sides, it makes tire clearance a major headache, even with existing sidewinder chassis and components. With the larger tires, an inline chassis is usually a necessity! Until now, the choice has been limited in the selection of parts used in the construction of inline chassis. The popular choice has been the brass style, "U-shaped" bracket that fits the rear axle, and has a provision for a screw in motor.
This is a stamped and folded piece that can have any number of problems, such as poor alignment of the rear axle (makes the car dog track as it goes down the drag strip) and most importantly, the alignment of the motor and axle! When the motor and axle are not aligned properly, it make a good gear mesh impossible. The axle and motor shaft MUST mounted at the same height.
The first advantage of the DRS SW15 solution is the front nose piece. It allows, depending on body type and personal preference, the front of the body to be mounted at three points: straight off the front, or to the sides of the nose with two different locations. Remove the pair of side frame horns that are not needed. It also has an adjustable front axle mount, which allows the use of a incredibly wide range of bodies, from muscle car favorites of the '60s and '70s all the way back to Gasser models of the '30s and '40s! And, of course, it will also work equally well with those lexan bodies that have been hard to use with a conventional sidewinder setup.
The DRS-SW15 chassis features a sturdy, precision .050" steel Motor Tab to mount your motor with screws, and rest assured, our motor tab and pillowblocks are exactly aligned properly for maximum performance. You will notice that the motor tab has provisions for either horizontal or vertical motor mounting. It also will take our new four screw motor mounting system that we developed for our new Gen III Motors, again either horizontal or vertical. The pillowblocks are sized for 3/32nd axles. No more adapters, and Ball Bearings are now easy to use! The rear of the body may be mounted with a solid or "floater" tube at the chassis balance point, at the forward, higher upright hole, or the slightly lower rear hole (as shown). Holes are large enough to permit proper“float" with either .050" or .062" tubing.
DRS-SW17 Inline Chassis Kit 4 ½ Guide Lead
Use with 1 1/16th to 1 1/8th Diameter Large Hub Tires
Fits: AMT '88 Mustang, AMT '97 Mustang, Tamiya '94 & '95 Mustang, Revell '69 Mustang, AMT '67 Camaro, Revell '69 Camaro, AMT '89 & '90 Ford Probe, Brookfield Dodge/Plymouth Neon Promo, MPC '82 Chevy Cavalier.
We've heard your requests for a real Pro Type Inline Chassis for Hardbody racing, and the DRS SW17 is one of several chassis we've developed to respond to those needs The "California Style" of Hardbody racing makes use of both normal and large, wide, "scale" tires on older, "nostalgia"-style bodies.
As model kits of these cars are not as wide as later cars, and generally have a great deal of body tuck-under or curved sides, it makes tire clearance a major headache, even with existing sidewinder chassis and components. With the larger tires, an inline chassis is usually a necessity! Until now, the choice has been limited in the selection of parts used in the construction of inline chassis. The popular choice has been the brass style, "U-shaped" bracket that fits the rear axle, and has a provision for a screw in motor.
This is a stamped and folded piece that can have any number of problems, such as poor alignment of the rear axle (makes the car dog track as it goes down the drag strip) and most importantly, the alignment of the motor and axle! When the motor and axle are not aligned properly, it make a good gear mesh impossible. The axle and motor shaft MUST mounted at the same height.
The first advantage of the DRS SW17 solution is the front nose piece. It allows, depending on body type and personal preference, the front of the body to be mounted at three points: straight off the front, or to the sides of the nose with two different locations. Remove the pair of side frame horns that are not needed. It also has an adjustable front axle mount, which allows the use of a incredibly wide range of bodies, from muscle car favorites of the '60s and '70s all the way back to Gasser models of the '30s and '40s! And, of course, it will also work equally well with those lexan bodies that have been hard to use with a conventional sidewinder setup.
The DRS-SW17 chassis features a sturdy, precision .050" steel Motor Tab to mount your motor with screws, and rest assured, our motor tab and pillowblocks are exactly aligned properly for maximum performance. You will notice that the motor tab has provisions for either horizontal or vertical motor mounting. It also will take our new four screw motor mounting system that we developed for our new Gen III Motors, again either horizontal or vertical. The pillowblocks are sized for 3/32nd axles. No more adapters, and Ball Bearings are now easy to use! The rear of the body may be mounted with a solid or "floater" tube at the chassis balance point, at the forward, higher upright hole, or the slightly lower rear hole (as shown). Holes are large enough to permit proper“float" with either .050" or .062" tubing.